OBS Studio Best Settings on Portable Dual Monitors Setup: Stream Switch on Twitch like a Pro!
2021/05/12 |By G Editor.
After connecting the devices for live streaming, the following is the guide to use the free software, OBS Studio, to stream Switch gameplay! Our goal is to imitate a professional live streamer to make a streaming video with Stream Overlay, transparent chat and a picture-in-picture webcam image, and introduce the detailed settings of microphone, and conduct a professional Twitch live streaming!
For setting up Switch streaming equipment, please read this article
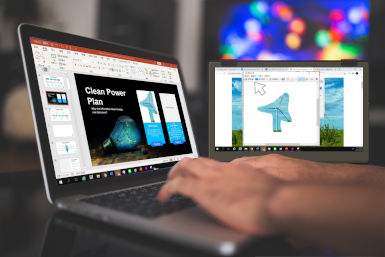
▼Portable Dual monitors for live streaming!▼


▼Add a personalized overlay, a webcam, and a transparent chat making your live streaming more eye-catching!▼


Install OBS
Firstly, you need to install OBS software on the laptop.
➤ OBS Official website → https://obsproject.com/
➤ Click the corresponding operating system of your laptop to download the software.

➤ Open the downloaded zip file and execute the installation
➤ After the installation is completed, open OBS. Let us start!
Add Video and Audio Input Sources
The first step is to deliver the Switch gameplay video and audio to the live streaming software through the capture card!
🔗 Add Video and Audio Capture Sources
#1: In the "sources" section, find the "+" symbol and select "Video Capture Device."
#2: The Create/Select Source window will automatically pop up. Click OK to exit!
")
")
#3: In the Properties popup window:
• Device ➤ Choose the name of your capture card
• Resolution/FPS Type ➤ Select "Custom"
• Resolution➤ 1920 X 1080
• FPS➤ 60
")
#4: If you need to add a webcam, add another "Video Capture Device," and choose the name of your webcam in the list!
💡 Tips: Drag the border to resize the picture & hold Alt key to crop the border!
")
#5: Next, in the "Sources" section, click the "+" symbol. Add "Audio Input Capture", and select your capture card! Normally, you will see the "Audio Input Capture" appearing in the middle mixer section with green bar running!
")
")
Reduce Microphone Background Noise Settings
Here we are going to reduce the microphone background noise. If you would like to response to the chat by voice, this step helps ensure the quality of live streaming!
🔗 Reduce Microphone Background Noise: Add Gain, Noise Suppression, and Noise Gate
#1: Go to the "Audio Mixer" section. > Right click on the bar of the microphone and select "Filters."
")
#2: After entering, right click at the black area, and select "Gain."
#3: "Gain" increases the microphone volume. You can adjust it according to your demands. It is not advisable to adjust the gain value too high, otherwise it will easily cause excessive audio noise. We set it to +6dB.
")
")
#4: Next, right click and select "Noise Suppression" to eliminate the background noise caused by increasing the gain. Pull to the left to reduce the noise, we set it to -26 dB!
")
")
#5: If you have added "Noise Suppression", but still can't completely eliminate the noise, you can right click to add "Noise Threshold" to set more details :
➤ Turn on threshold: We set to -26dB. It means that any audio lower than -26dB will not be recorded.
➤ Turn-off threshold: If the audio is lower than this value, it will be automatically muted. We set it 5dB lower than the turn-on threshold!
There are no specific settings for the above values. You can do a few experiments to find out the most suitable setting for you!
")
")
Scene setting
Finally, we come to graphic design, the most interesting part! The OBS sources box just likes the layer panel in PHOTOSHOP. The upper and lower order represents the overlapping position, the eye symbol by the sides represents showing or hiding the source, and the lock symbol can fix the layer without being moved!
After adding the webcam, part of the gameplay video may be overlapped. So, you can resize both of the webcam and the gameplay video. Next, we can add a background to cover the exposed part at the bottom to beautify the video!

🔗 Add a Background Overlay
After shrinking both the game images and the video pictures, the black bottom layer will be exposed. At this time, we can add your favorite background to the bottom. It shows your characteristics!
#1: Open the background folder.
#2: Directly drag the selected background to the platform.
#3: Drag the background to the bottom in the source box. Done!
🔗 Add a new chat room
#1: Enter Twitch TV, click the profile picture at the upper right corner, and click the "Channel" option in the drop-down menu.
")
#2: After entering the channel page, click the "Chat" tab below.
")
#3: Click the gear button (Chat Settings) below, and select the "Popout Chat" option.
#4: After the chat window pops out, copy the URL above.
")
")
#5: Press "+" to add "Browser" at the source box, and name it "Chat Room" in the popping out window.
#6: Click "OK,"and a new window pops out.
➤ URL: Paste the URL we’ve copied.
➤ Width: 800 (Type in the value according to your demands.)
➤ Height: 600 (Type in the value according to your demands.)
")
#7: In the "Sources" section, find the "Chat Room" and press the lock symbol to prevent the window from running around!
")
🔗 Transparent Chat Box
#1: We use the widgets on Streamlabs to make the chat window transparent! Click here to go to the Streamlabs login page. You can select Login with Twitch (the purple button.)

#2: After entering, type in "Chat Box Widget Settings."
#3: After entering, go to the Widget URL and click "Copy" to copy the URL. There are also functions such as changing chat font…etc., which can be adjusted by yourself!


#4: Go back to OBS, at the chat room layer, right click and select properties. Then past the URL!
Output Settings
Finally, we are going to do live streaming settings on Twitch!
This paragraph is going to configure stream, output and video settings. After the settings are completed, your live broadcast is able to go online smoothly!
🔗 Connect to Twitch
Firstly, enter the Twitch TV page.
#1: Go to Twitch TV, and click your profile pictures. Then, select "Creator Dashboard" > "Settings" > "Stream" in the drop-down menu > copy the primary stream key.
*Do not let others know your stream key, or they are able to stream to your Twitch channel.
")
Go back to OBS platform.
#2: Press "Stream," and select "Twitch." You can also select other platforms such as FaceBook Live, YouTube…etc.!
#3: Paste to the stream key box. Finished!
")
🔗 Output settings
#1: Click the "Output" tab, and select "Advanced." > Click "Stream."
#2: Encoder > Select> H.264. Select the encoder to continue adjusting the bitrate!
*Another option is X264. X264 has clearer image quality than H.264 when at the same bitrate, but the X264 encoder takes more CPU resources. If you find lagging, please choose H.264 instead!
#3: Next, let’s configure the bitrate. Bitrate and resolution are both critical to stream video clarity! The bitrate your stream video can support will depend on your internet upload speed!
➤ Step 1: Check the network publishing speeds: https://www.speedtest.net/
*If the upload speed is lower than 5Mpbs, you can consider upgrading the network speed first before coming to live streaming!
➤ • Step 2: Although the higher bitrate gains better quality, you also need to consider the network bandwidth and platform limits. Otherwise, there may be delays or dropouts! Here we type in the upper limit of the Twitch image bitrate 6000kbps!
The reference value of bitrate for the platforms:
")
*Usually, the higher the video bitrate, the better the images output quality, but if the bitrate is set too high, it will cause the computer to be overloaded. Please choose the appropriate video bitrate according to the resolution!
#4: "Encoder Preset (higher = less CPU)" is the CPU usage rate setting. Here we select > veryfast
#5: Keyframe Interval: Here we set to 2
")
Next, let's select the video's resolution!
🔗 Set Video Resolution
# 1: Select "File" in the upper left corner. > Click "Settings." > Click the "video" tab.
# 2: Base (canvas)Resolution: Select the highest resolution of Switch. > "1920 x 1080"
*If you need to shrink the file, you can also enter a lower resolution.
#3: Output (scaled) resolution: Set to "1920 x 1080", the same as Switch highest resolution.
# 4: Downscale Filter: select "Lanczos (sharpened scaling, 36 samples)"
*If the performance of the graphics card is normal, you can consider choosing: Bicubic (16 samples)
")
Finally finished! The basic settings of OBS ends up here, and you can successfully upload a professional live video!
Being a pro streamer, it’s not as difficult as you think! With the easy-carrying M505E portable monitor & laptop, we can easily start professional game streaming wherever we go, and thus has various streaming background which makes the streaming distinguished. With this dual-monitor streaming device on the go, you can also live on time every day without affecting the schedule!
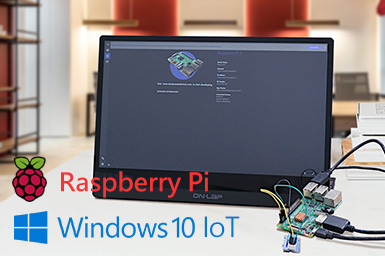
▼Super lightweight portable monitor for laptop, even put it on the desk does not take up space! ▼