【For MacBook Newbie!】Tips of Screenshots in Mac and iWork Skills on Dual Monitors
2021/10/22|By G.Editor
Apple has made a big upgrade on the Mac screenshot function after macOS Mojave (10.14). Compared with the previous function that only supports keyboard shortcuts to take screenshots, the newest version is more intuitive and convenient! There are more detailed options in screenshot settings, editing and sharing functions, and even a new "screen recording function" is added.
This article is going to introduce the built-in apps that should not be unknown for Mac users, and demonstrates how to use the built-in Screenshot and Photo Editing software on dual monitors, applying them to the iWork suite of productivity apps (likes Pages, Numbers and Keynotes).
Even if you are new to MacBook, you could improve your work efficiency immediately by mastering the tips of using the built-in software.
▼ The tips below are applicable for the version after Mojave (10.14). If it is the old version, please update firstly.
Open the Screenshot App and Introduction to Functions

Press Command(⌘) + Shift + 5/ or use the launch pad --> Open the "Screenshot" app

❶ Capture Entire Screen ❷ Capture Selected Window ❸ Capture Selected Portion ❹ Record Entire Screen ❺ Record Selected Portion
*To stop recording, click the "Stop Recording![]() "button in the menu bar.
"button in the menu bar.
Options Menu
➤ Save to
The default save location of screenshots is Desktop. To avoid desktop messed up, you can create a folder on desktop firstly, and change the location for storing the captured images.
➤ Timer
Include a 5-second or 10-second screenshot delay for selection.
➤ Options
1. Show Floating Thumbnail:Enable or disable the screenshot preview thumbnails on the lower right corner.
2. Remember Last Selection:The range of “Capture the selected area” will be opened in the same position and size as last time.
3. Show Mouse Pointer:Hide or show the mouse cursor in screenshots or recordings.
💡Notes 1:keyboard shortcuts
Although the function has been completely upgraded, the Screenshot keyboard shortcuts can still be used in the later version of Mojave.
Common shortcut keys:
● Capture Entire Screen : Command (⌘)+ Shift + 3

● Capture Selected Portion : Command (⌘)+ Shift + 4

● Capture Selected Window : Command (⌘)+ Shift + 4 + Space

💡Notes2:How to convert a PNG image to other formats?
Screenshots will be saved in PNG format by default. To convert a PNG image to JPEG or other formats, please open the image with "Preview" and click "File" > "Export", and then select the format to save.


Tips: How to Quickly Copy and Paste
When capturing the image, press and hold the "Control"key can copy the captured image of the entire screen or only the part of the screen. Next, press"Command (⌘)+ V" to quickly paste to other locations (ex: email or other applications).


How to Edit Pictures Quickly with "Preview" App

Another Mac built-in, powerful editing software to be recommended is "Preview."Although the name does not sound too special, it is a practical software that integrates multiple editing functions. Whether editing annotation, cropping the image, adjusting the colors or signing the document...etc., all can be done by the "Preview" function!
Double-clicking the picture, and it will be automatically opened in the built-in "Preview." Next, click the "Marker Toolbar![]() 」" at the top right to start to edit the picture.
」" at the top right to start to edit the picture.
➤ Selection Tool:
Include 4 types of selection. Click "Smart Lasso![]() " and use the red pen to extract the part. Next, click "Crop
" and use the red pen to extract the part. Next, click "Crop![]() ", and the software will automatically determine the position to be cropped.
", and the software will automatically determine the position to be cropped.

➤ Remove Background Tool:
Click "Alpha now![]() ", and hold down the background you wish to remove. The selected area will become red, and then press Delete to remove the background. If you want to re-do, press ESC to select again.
", and hold down the background you wish to remove. The selected area will become red, and then press Delete to remove the background. If you want to re-do, press ESC to select again.

➤ Resize Image:
To adjust the size, click the "Resize![]() " button and press OK. In the "Preview" app, you can select multiple pictures at a time, and don’t have to resize them one by one!
" button and press OK. In the "Preview" app, you can select multiple pictures at a time, and don’t have to resize them one by one!

➤ Photo Retouching:
Click the "Adjust Color![]() " button to adjust the basic colors, contrast, color temperature, saturation, sharpness and so on.
" button to adjust the basic colors, contrast, color temperature, saturation, sharpness and so on.

➤ Picture Text and Annotations :
Click the "Shape![]() " and "Text
" and "Text![]() " buttons to annotate an image. At the right side of the tool bar (framed by the red line), you can adjust the line thickness, color, font and font size.
" buttons to annotate an image. At the right side of the tool bar (framed by the red line), you can adjust the line thickness, color, font and font size.

💡 More detailed instructions, please refer to : Preview User Guide for Mac.
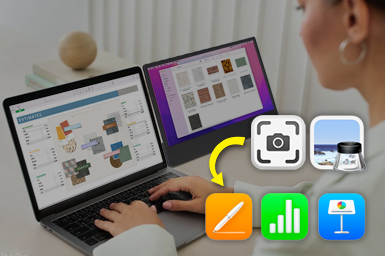
Apply Pages on Dual Monitors

Pages is used for documents or magazine layouts. On the main screen, use Shape Library to create different shapes of frame, and search materials and capture the desired pictures on the second screen to automatically save them to the folder on the desktop. After finishing the layout of design, drag and drop the captured pictures from the second monitor to the frame, and the image will be automatically converted into a mask.
You can also use the second monitor to browse the pages to find inspirations, or immediately capture the layout style you like.
The biggest advantage of using dual monitors for editing is that you don’t have to constantly switch between windows or split screens to import image, which saves lots of time!


Visualize Data with Numbers

The best feature of Numbers is that its editing area is like a canvas. Any pattern can be arranged on request. You can add tables, pictures or more to organize the data in the way you want, allowing you to create stylish trial calculation sheets!
Take the following quotation from the interior design company as an example. The original spreadsheet design is difficult to present the actual materials and patterns of the products. Yet, by adding the picture as visual aid, the data is successfully turned into an attractive graphic.
By using dual monitors to freely add pictures, charts and diagrams makes the data analysis more appealing!


Display a Slideshow, Video Presentation with Keynote

Keynotes can use the tools in Shape Library for layout just like Pages. In addition to this, it also can use the functions in "Media"> "Image Library" to make a slideshow. Select multiple pictures from the second monitor and drag them directly to the frame. Then, use the tools in the sidebar, and you can set animation effects for the slideshow.


The screen recording is a very convenient function for recording slideshows or tutorial videos. If you want to cut a certain video clip and put it in the presentation slides, you can use trim video into clips on the second monitor and drag them to the presentation slides, instead of importing the entire video or troublesomely editing it in an extra software.
More Tips: Quickly Insert Screenshots into Office Mac
If you are used to using Microsoft Office software on Mac, the good news is that the "Screenshot" function has been added to the Office 2016 for Mac. You can directly use this tool to take a window screenshot, and then go to the "Picture Tools Format" tab in the toolbar to edit the image.

Conclusion
After reading the tips above, don't you think that they are all very practical? One the the keys of Macbook productivity is its full range of built-in are the Apps. By mastering the use of the apps and making a good use of dual monitors when editing, you can definitely increase work efficiency and complete the work more simply!
If you would like to know more advantages and tips of using MacBook dual monitors, please refer to the articles below!